How to Recharge Your Air Conditioning

The weather is warmer and the sun is stronger – this means you’ll likely be turning on your car’s air conditioner again after a long winter. But what happens when your system starts to lose power and you no longer feel a burst of cold air? It might be time to recharge your A/C.

What you’ll need:

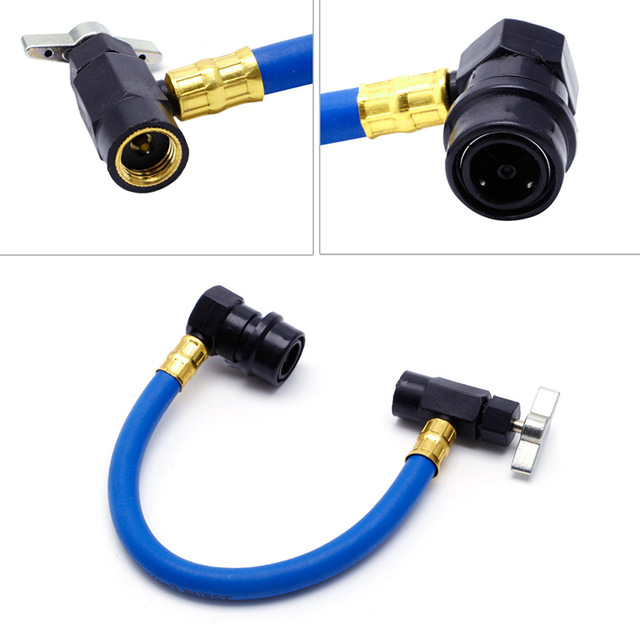
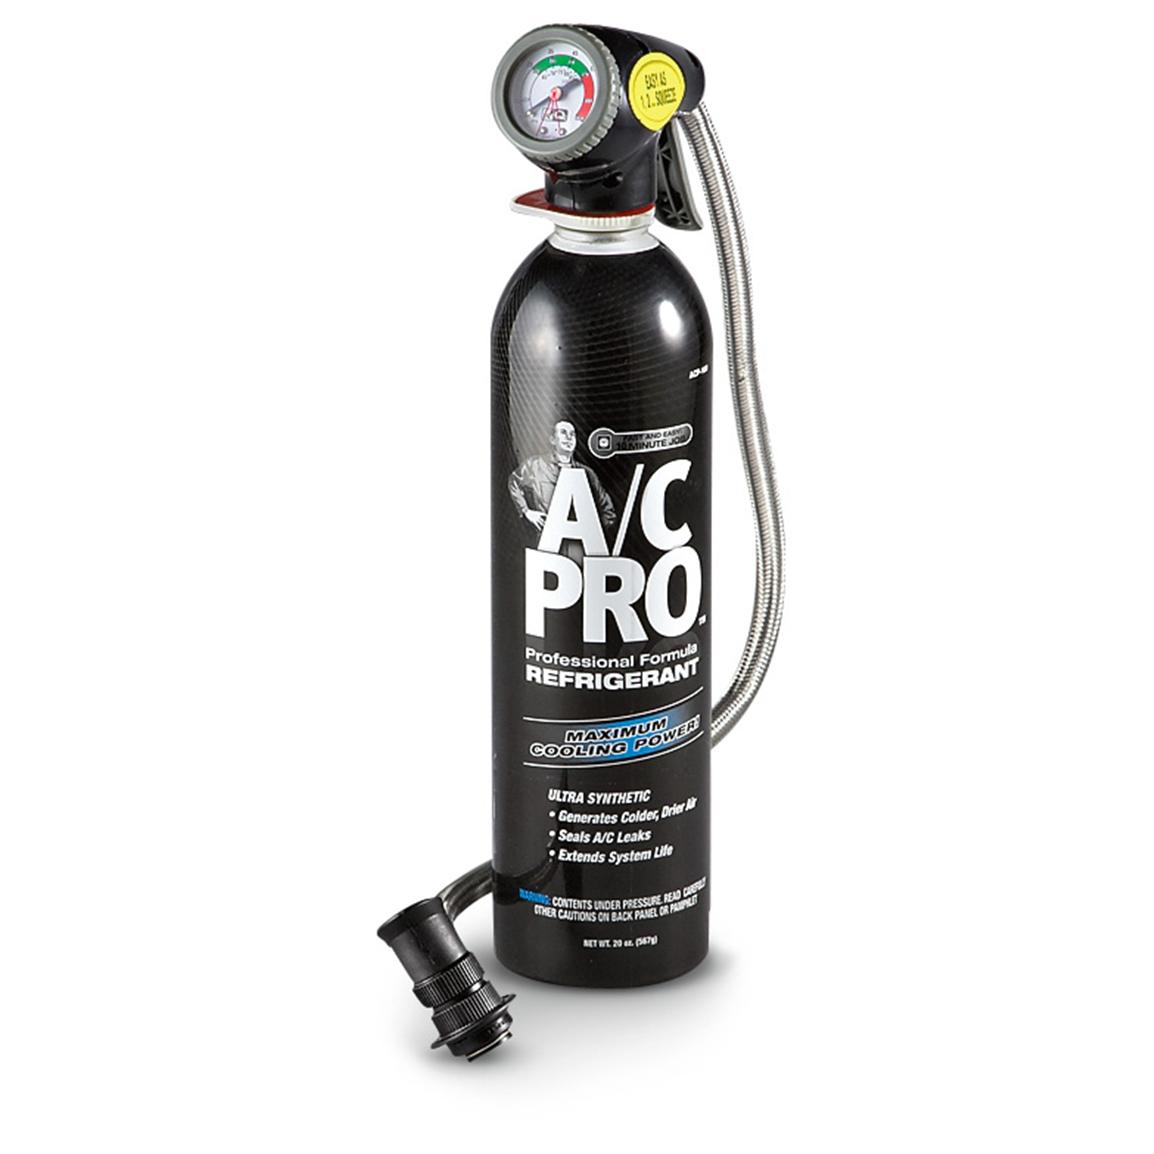
  • Refrigerant / Dispenser with Trigger and Gaug
  • Safety glasses and gloves

Wearing safety glasses while working under the hood is suggested to protect your eyes. Wearing gloves can also help prevent any skin damage caused by freezing refrigerant.

Step 1: Turn your A/C On.

Set your air conditioner to its maximum cool setting with the blower set to high.

ac 1

Step 2: See if your A/C Compressor is Running

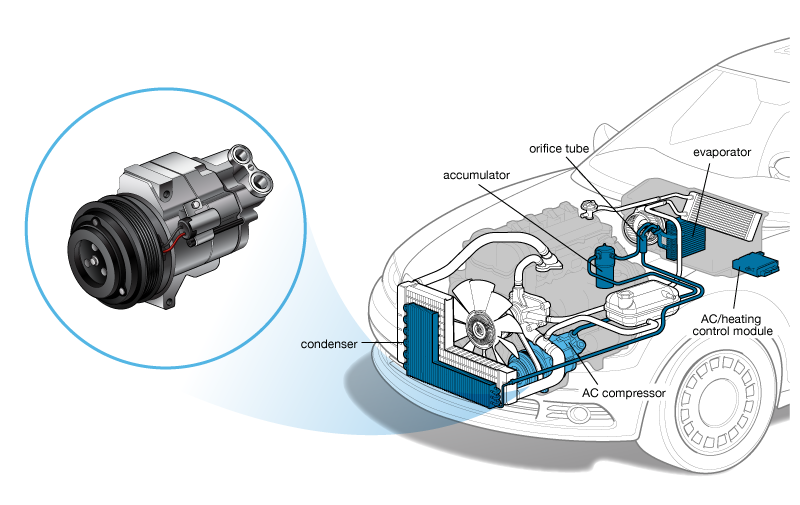
When your A/C system is set to high and functioning properly, pulleys at the end of the compressor should be spinning. If your compressor is functioning as it should, but you still don’t feel a big burst of cool air, it’s likely you’re just running low on refrigerant. Especially if you still feel a slight breeze coming through.

If the clutch is not engaged and pulleys are not spinning, it could mean that your A/C system is low on refrigerant, or there are electrical problems with the compressor itself.

In both cases, adding more refrigerant after testing this should help you see what the issue is.

ac 2

Step 3: Check the Pressure

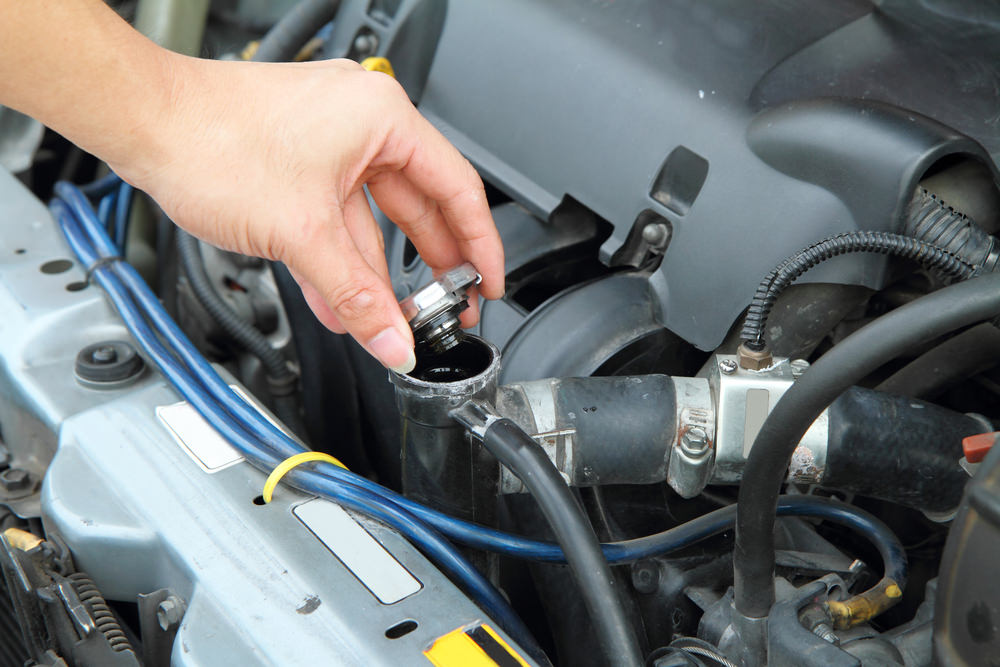
To check the pressure, first, be sure to turn your car off. Then, find the low-pressure port. This is typically located on the passenger side of the engine and can be identified by a black cap with the letter “L” written on it.

Step 4: Attach Recharge Hose

Place the fitting at the end of your recharge hose, cover the low-pressure port and push until you hear a click. Be careful upon handling. Accidentally pulling the trigger can result in releasing refrigerant from your A/C system.

Step 5: Start your vehicle

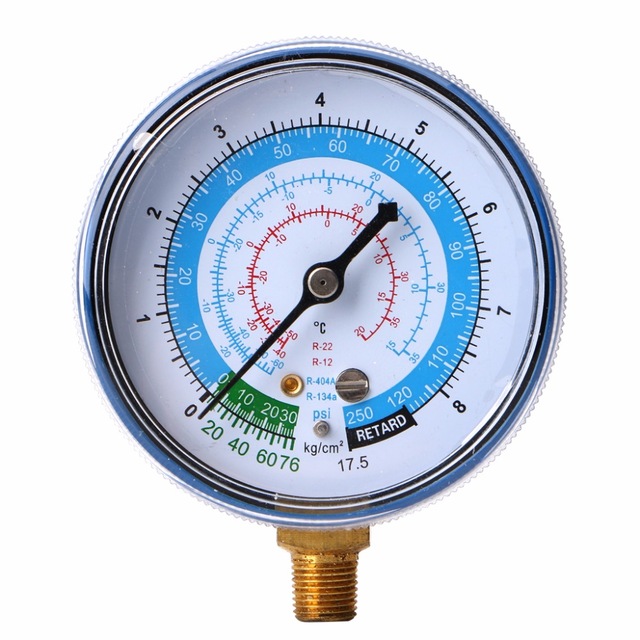
Start your car and ensure that your air conditioner is on its highest settings. Monitor your AC compressor to see if your clutch is engaged and the pulleys are spinning. If engaged, try to get a reading as close to 40 psi as possible. Anything under 40 is considered undercharged.

ac 5

Step 6: Install refrigerant can onto recharge hose

Once you’ve installed the refrigerant can hold upright and squeeze the trigger for 5-10 second increments. Upon releasing the trigger, be sure to measure the pressure gauge until you are as close to 40 psi as possible.

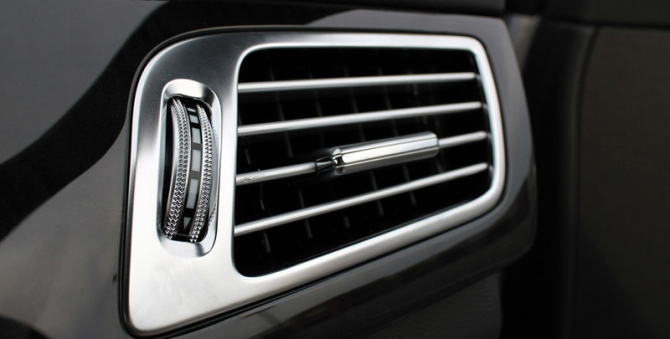
Step 7: Check Temperate Inside your Car

Insert a thermometer into your A/C vents and check the temperature. If your system is fully charged, you should get a reading between 28-30 degrees.

ac 7

Note that this is merely a temporary fix to a potentially bigger problem. Should your system be missing refrigerant, it could mean that there is a leak that must be looked at by a professional.

ac
Questions? Call Us

If you have any questions about a current policy, submitting a quote online, or prefer to get a quote over the phone, our agents are ready to help.

773-847-9000

Visit an Office

Find a local agent to provide a free quote or help you with questions about your current policy.

Find a Nearby Location

How Many Miles Can You Drive on Empty?

It’s very likely that you’ve seen your low fuel warning light on your dash at some point or another. Unfortunately, for various cars, once the light turns on, you’re unable to read just how much is left and if you’ll be able to make it to the nearest gas station.

Luckily, YourMechanic made a list of the 50 best-selling cars in the US and approximately how many miles each car has before it actually runs out of gas. So, while it’s never recommended to let your gas run dangerously low, it’s likely that you’ll make it to your location on your reserve.

Is your car on the list?

gallery-1473704534-isthetankreallyemptytho
fuel-2741_1280-1-1280x640
Questions? Call Us

If you have any questions about a current policy, submitting a quote online, or prefer to get a quote over the phone, our agents are ready to help.

773-847-9000

Visit an Office

Find a local agent to provide a free quote or help you with questions about your current policy.

Find a Nearby Location

Planning Your Cross Country Trip: Update Your Auto Insurance

When it comes to getting ready for a long road trip, there are many things vehicle owners need to think about. This is a good time to get the car tuned up, and the oil changed. It is also a good time to discuss the needs for new tires.

Aside from this, it also pays to invest some time into updating your auto insurance. The simple step of calling your car insurance agent and adjusting your policy may be able to provide you with exceptional benefits and lots of protection.

What You Need to Consider

Before a long trip, speak to your auto insurance agent about your current coverage. Here are a few things to talk about first.

  • Contact your auto insurer. Inquire about added protection your car may benefit from when you travel out of state. Discuss any concerns you may have.
  • Do you have enough insurance to cover your vehicle from collisions, storm damage, theft and vandalism? Now is a good time to invest in comprehensive and collision insurance. These types of coverage can help you
  • You may wish to up your liability insurance. Having the bare minimum insurance is not always enough for high risk driving like this.

Your agent may make suggestions to you as well. The key here is to be sure you have a considerable amount of protection against the most likely risks.

Think About the Extras, Too

There are various ways to customize your auto insurance to better meet your needs. For example, you may wish to choose insurance that also adds towing coverage. That way, you do not have to worry about an accident that leaves you stranded in an area that you are not familiar with.

Discuss the options for added protection for your belongings, too. For example, you may be carrying a great deal of belongings with you. This might include your electronics. It may also include any valuables you purchase on the road. The thing is, your car insurance might not cover these items. You might have to turn to your homeowner’s or renters insurance for protection. Ask your agent how to handle such claims should damage to belongings occur.

Every driver needs to make wise decisions before hitting the road. With auto insurance, it usually takes just a phone call to your agent. He or she will work with you to better understand your needs and goals. You will see just how easy it can be to modify your policy to better fit your goals and the current risks. Call us today for a Chicago auto insurance quote.

200299919-001_traveling_with_dog
Questions? Call Us

If you have any questions about a current policy, submitting a quote online, or prefer to get a quote over the phone, our agents are ready to help.

773-847-9000

Visit an Office

Find a local agent to provide a free quote or help you with questions about your current policy.

Find a Nearby Location

Why You Should Keep a Maintenance Log (FREE DOWNLOADABLE)

We’re all busy people with a lot of things on our minds. While we can convince ourselves that our memories won’t fail us, it’s easier said than done. Remembering is especially important when it comes to our vehicle’s maintenance.

Do you remember the last time your car got a tune-up or oil change?

Unlike filling our tank or washer fluid, certain services are done months apart making it harder to remember the last time you went to a mechanic. Plus, with all the other things going on in our lives, these items can go over our heads very easily.

Keeping tabs on the work being done on your car can be really helpful. It can help you prepare for the future and know when your next trip to the shop should be. Additionally, knowing when your next service is due can help you avoid any inconvenient experience and save you a lot of money in the long run too!

An easy solution? Keep a maintenance log in your car.

A maintenance log is a small notebook, pad or sheet where you can record the services being done to your car. Try to get a something small or foldable that can fit in your glove compartment. If you have a notebook, place a pen in the spirals so you always have something to write with. Even if you only have a sheet of paper, make sure you always keep something to write with nearby.

While there are many maintenance log notebooks available for purchase online, we’ve included a FREE downloadable log for you to print and use. Click here to download.

Here’s how to fill it out:

  • Date – Add the date in which you went to get work done.
  • Service – Write out any service performed that day.
  • Shop – Write out which mechanic or garage you went to.
  • Paid – Write how much you paid for a service. TIP: If you decide to try out different mechanics or shops, this column can help you compare prices down the line.
  • Comments – Write any important comments or reminders. Here is where you should write when your next visit should be.

Example:

Date

Service

Shop

Paid

Comments

3/21/18

Oil Change

Amigo Repairs

$30

Next change at 50,000 miles

Now that you’re ready to get organized, you no longer have to stare blankly at the mechanic when he asks when your last tune-up was.

Signed,
Amigo Insurance

amigo smile
log
Questions? Call Us

If you have any questions about a current policy, submitting a quote online, or prefer to get a quote over the phone, our agents are ready to help.

773-847-9000

Visit an Office

Find a local agent to provide a free quote or help you with questions about your current policy.

Find a Nearby Location

How To Change a Flat Tire

You’re driving to an important meeting or doctors appointment when you hear that awful flapping noise coming from your back tire. Looks like you’ve got a flat.

Getting a flat tire is something that’s bound to happen to almost every driver. In fact, according to statistics, every driver will experience an average of 5 flat tires in their lifetime. What’s worse is that it always seems to happen at the worst possible moment.

Fortunately, you don’t have to go it alone. Changing a tire is a simple process that can be done in 15-30 minutes depending on experience. All you need is a couple of tools that you might already have in your car. If you don’t, they can be found at your local auto parts supplier at inexpensive prices.

So, before you pick up the phone and call a tow truck, see if you can change the tire yourself.

Tools You’ll Need

  • Spare Tire (TIP – check your spare regularly and ensure it’s properly inflated)
  • Jack
  • Lug Wrench
  • Flashlight
  • Tire Gauge
  • Gloves
  • Flares or Reflective Triangles
  • Wheel Wedges
  • Owner’s Manual
act like a car
  • Step One: Find a safe spot to pull into. If a tire blows out whilst on the road, turn your hazard lights on and pull into a safe space. If you’re on a busy street or highway, try to pull away from traffic as far away as possible. Suitable areas include parking lots, the shoulder of an off-ramp or a straight, flat, side street. Try to avoid any areas at an incline.
  • Step Two: Once in a safe area, make sure your parking brake is engaged and get your tools and spare ready to use.
  • Step Three: If on hand, use flares or reflective triangles on the back of your vehicle. These are particularly handy if you get a flat tire in the late afternoon or night. They will let other drivers know that a vehicle has stopped.
  • Step Four: Use the wheel wedges and place them against the tires on the opposite side of the flat. This will help make sure that the vehicle is secure while you use the jack.
  • Step Five: Remove the hubcap. If the lug nuts are exposed, you don’t have to do this step. Using the flat end of the lug wrench, remove the wheel cover.
  • Step Six: Loosen the lug nuts with the lug wrench. Do Not Remove.
  • Step Seven: Move jack under your car.
  • Step Eight: Carefully expand the jack until the flat tire is about 5-6 inches off ground. Remember not to place any part of your body under the vehicle. A fault in the jack could result in serious injury if not careful.
  • Step Nine: Unscrew and remove lug nuts. Be careful not to lose them as you’ll need them once the spare is on.
  • Step Ten: Remove the flat tire from the hub by placing two hands firmly on the tire and pulling towards you.
  • Step Eleven: Align your spare tire with the exposed lug bolts and push them into place.
  • Step Twelve: Replace the lug nuts with your hands. Don’t use the wrench until after your vehicle has been lowered.
  • Step Thirteen: Lower the jack until the spare tire touches the ground safely. Once on the ground, remove the jack.
  • Step Fourteen: Using the lug wrench, tighten the lug nuts. Make sure they are tightly secured.
  • Step Fifteen: Replace the hubcap or wheel cover.
  • Step Sixteen: Remove wheel wedges from the tires you previously placed them on.
  • Step Seventeen: If you have a tire gauge, check the spare tire’s pressure. If it does not match your vehicle’s PSI, drive to your nearest gas station and fill accordingly.

Keep in mind that it’s not advised to go long periods of time on a spare tire. It’s recommended you take your flat tire to a repair shop and get it replaced or repaired.

While changing your own tire can certainly save you a couple of bucks, safety should always be your number one priority. Consider the weather, location or tool condition when deciding if you should do it yourself or call for help.

Signed,
Amigo Insurance

amigo smile
How-to-change-a-flat-tire
Questions? Call Us

If you have any questions about a current policy, submitting a quote online, or prefer to get a quote over the phone, our agents are ready to help.

773-847-9000

Visit an Office

Find a local agent to provide a free quote or help you with questions about your current policy.

Find a Nearby Location

5 Car Maintenance Tasks You Can Do Yourself

We all try to play the saving game as best as we can. However, when even the smallest of things go wrong with our cars, it’s easier to schedule time at the shop than try to fix it ourselves, costing us quite a bit of money in the process. And while many things should be left to the professionals, there are a couple of tasks that you can easily check or fix at home.

Things You’ll Need

  • Rag or towel
  • Tire Pressure Gauge
  • Receptacle
  • Your Car’s Manual

Windshield Wipers

windshield wipers

You don’t need to be a car genius to know how to change your windshield wipers. Blade set-up may differ from car to car so it’s important to check your vehicle’s manual, but it goes something like this:

  1. Lift the blades, similar to when you wash them, and remove old blades.
  2. Be sure to look at how the old blades connect to the metal arms. This so you know how your new ones will be attached.
  3. Find the tab on the underside of the wiper and push to remove old blade.
  4. Attach new blades carefully so as to not bend or scratch your windshield.
  5. Line everything up and make sure they are both secure.
  6. Generally, the packaging for new blades offers additional helpful tips and diagrams in case you’re unsure.

Tire Pressure

tire pressure

Having correct tire pressure is very important as it helps evenly distribute the weight of your car. When tire pressure is off, due to either under or over-inflating, the tire loses that stability and can negatively impact your car’s stride. When tire pressure is too low, you’ll see a TPMS (Tire Pressure Monitoring System) sensor light up on your dashboard. This means it’s time to check your tires. Luckily, this doesn’t have to break the bank and can easily be done in less than 5 minutes with a basic tire pressure gauge.

  1. First, be sure to check your vehicle’s recommended PSI. This can be found on the inside of the driver’s side doorjamb or in your owner’s manual.
  2. Remove the caps from the tire air valves; place the gauge on the valve creating a solid seal between gauge and valve.
  3. Apply pressure to get a reading. Do this for all four tires.
  4. If the pressure is too low, use an air compressor to add air. These are available at many gas stations. Ensure that you add air to match your vehicle’s PSI.
  5. If you overfill your tires, use the back end of pin to remove any extra air.

Fluid Levels

fluid levels

Don’t let the sight of your engine or fancy car terminologies intimidate you. Checking your vehicle’s fluid levels can be quite easy and time effective. As a general rule, a fluid level check is recommended every 1-2 months. To check any fluids under your hood, be sure to park your car in a flat, well-lit area and let the engine cool for about 20 to 25 minutes.

Check Your Oil

oil-splash
  1. Identify the dipstick. This is a long, thin rod with a ring or handle at the top. Not to be confused with your transmission fluid dipstick. As always, refer to your owner’s manual to be sure.
  2. Pull the dipstick all the way out, wipe it with a rag or towel and reinsert. This will ensure a better reading of the fluid level.
  3. After a couple of minutes, pull the dipstick out once more and check if the oil level is near the FULL line.
  4. If not, add more oil. Your manual will state what kind of oil is best for your vehicle.
  5. Be sure to never overfill the oil reservoir.
  6. To add oil, simply locate the reservoir, remove the cap and use a funnel to add. Wipe any excess or spilled oil with a rag or towel. Place the cap securely on the reservoir and recheck your levels.
  7. If you notice that your oil is black or brown and not clear light brown and shiny, you might need to go get your oil changed professionally.
  8. For a helpful graphic, click here.

Check Your Windshield Wiper Fluid

automotive-wiper-fluid2-512
  1. Find the windshield wiper fluid reservoir. This is usually a white plastic container or tube with the picture of a windshield. You can find the exact location of this reservoir in your manual.
  2. If the level is lower than the FILL line, remove the cap and add the appropriate fluid with a funnel. Do not add water.
  3. Be sure to close the lid securely once you’re finished.

Flush a Radiator

radiator flush

Keeping a radiator from overheating is essential. Unfortunately, over time, sludge can build up inside the generator making your coolant less effective. In turn, this can negatively affect your engine’s performance and mileage. A coolant service is generally recommended every 30,000 miles or five years. However, it’s always important to check your owner’s manual for your vehicle’s recommended specifications. Here’s how that goes:

  1. Make sure your engine is cool. This will prevent any injury should you make any contact with the engine. A good time to work is two hours after your vehicle’s been last used.
  2. Locate your vehicle’s radiator drain plug. Place a coolant receptacle under the drain and unscrew the plug. Allow the coolant to drain into the receptacle.
  3. Replace drain plug and remove the radiator cap. With a funnel, add radiator flush cleaning solution to the radiator and fill the rest with water.
  4. Replace and tighten the cap. Start your car, turn your heater on to the hottest setting, then let cool for about 10 -15 minutes. After those minutes are up, turn your car off and wait for your car engine to cool.
  5. After your engine has cooled back down, unscrew the drain plug and empty its contents into your receptacle.
  6. Replace drain plug. With your funnel, fill the radiator with 50% coolant and 50% water. Tighten all caps and voila!

Jump Start Your Car

jumpstarter

Knowing how to jump-start a car is an essential roadside know-how. In many cases, it can not only help you get back on the road but also help be a good Samaritan by knowing how to help other drivers in need.

  1. Have a friend or family member offer to help. Have them drive the good car up to your car so batteries are as close as possible.
  2. Attach the red positive cable to the good car battery terminal, then attach the other red positive cable to your car’s battery terminal.
  3. Attach the black negative cable to the good car battery, then ground the car by attaching the other black negative to a solid, unpainted metal surface on your car (a bolt, for example) as far away from the battery as possible. Avoid any moving parts in the engine.
  4. Start the good car first and wait 2 minutes. Then, start your car and wait for 2 minutes.
  5. Remove the cables in the reverse order they were attached in.
  6. Let your car run for 2 more minutes then hit the road!
  7. For a helpful diagram, click here.

Simple as many of these steps may be, be sure to recognize when something is out of your capabilities or knowledge. If you’re unsure of how to proceed, take your care to a professional and avoid any further damage.

Signed,
Amigo Insurance

amigo smile
mechanic-1024x680
Questions? Call Us

If you have any questions about a current policy, submitting a quote online, or prefer to get a quote over the phone, our agents are ready to help.

773-847-9000

Visit an Office

Find a local agent to provide a free quote or help you with questions about your current policy.

Find a Nearby Location

How to Jump a Car Battery

You hop in your car, ready to go, only to hear a strange clicking noise when you turn your keys in the ignition. It sounds like your battery is dead.

So now what? An experienced driver likely knows how to approach the situation. But what about those who’ve never dealt with the frustration of their car not turning on?

Here’s a step-by-step guide to help:

1

1) Suppose a friend or any Good Samaritan offers to help. Have them drive the GOOD CAR up to YOUR CAR so the batteries are as close as possible.

2

2) Attach the red ‘positive’ cable to the GOOD CAR battery terminal, then attach the other red ‘positive’ cable TO YOUR car battery terminal.

3) Attach the black ‘negative’ cable to the GOOD CAR battery, then ‘ground’ the car by attaching the other black ‘negative’ to a solid, unpainted metal surface on YOUR CAR (such as a bolt), as far away from the battery as possible. Avoid any moving parts in the engine.

4

4) Start the GOOD CAR first, wait 2 minutes, then start YOUR CAR, wait for 2 minutes.

5

5) Remove the cables in the REVERSE order they were attached in (i.e Black/Your Car, Black/Good Car, Red/Your Car, Red/Good Car)

6

6) Let YOUR CAR run for 2 more minutes then hit the road.

Remember:

Red Goes to Red – RED = Positive +

Black Goes to Black – BLACK = Negative –

No Luck?

If this doesn’t work, it may mean that the terminals in your car battery are no corroded. You may want to move them back and forth to try and get a connection and get rid of some of the gunk on them. If you have an older car, it could also just mean that your battery is old. If that’s the case, it’s time to replace the battery.

Make sure to always have jumper cables in your trunk just in case an accident happens.

Signed,
Amigo Insurance

amigo smile

Electric shock hazard: Failure to follow these step-by-step instructions could result in electrical shock or other serious injuries. If you’re unsure about anything in this article, please contact a mechanic or another car specialist.

can-a-goal-zero-yeti-solar-generator-jump-start-a-car
Questions? Call Us

If you have any questions about a current policy, submitting a quote online, or prefer to get a quote over the phone, our agents are ready to help.

773-847-9000

Visit an Office

Find a local agent to provide a free quote or help you with questions about your current policy.

Find a Nearby Location

Get a Quote the Way You Want

click

Online

Start a Quote

phone

By Phone

773-847-9000

in-person

In Person

Find a Location